Build Marlin 2.0.x Firmware for CR-10S
Update 12/23/2023:
This method still works fine with 2.1.x. The main difference is where you get the default configurations, which are now found in this repository. Make sure you select the branch that matches your version of Marlin.
In a previous post, we build the Marlin v1.1.9 firmware for your Creality CR-10S (or other printer). In this post, we’re going to walk through doing it for the 2.0 Bugfix branch. The 2.0 branch adds support for printers that use faster ARM-based and 32-bit boards. It retains support for the 8-bit AVR boards while continuing to improve it.
2.0 does this by introduction an abstraction layer called the Hardware Abstraction Layer, or HAL. The HAL allows Marlin to reuse more code, as well as maintain one single code base. This also allows them to keep supporting those ubiquitous 8-bit AVR boards while building in code for the newer platforms. I’m running this on Ubuntu Linux 18.04, but it should be easily adaptable to any other distro.
Anyways, let’s build this thing:
Steps
Prep your environment
- Install pip
sudo apt-get install pip - Install PlatformIO for building Marlin
pip install -U platformio
I had to install these packages on my Ubuntu machine:
`python3-tk
Get the Marlin code
Clone the Marlin source, we just want the
2.0.xbranchgit clone --single-branch --branch 2.0.x http://github.com/MarlinFirmware/MarlinDownload the example zip file (check the Marlin/config/README.md for latest URL)
wget https://github.com/MarlinFirmware/Configurations/archive/release2.0.5.zipUnzip it
unzip ./release2.0.5.zipCopy the config directory over
cp ./Configurations-release-2.0.5/config ./Marlin
Configure your build
Change into the Marlin directory
cd Marlin/MarlinCopy the CR-10S configuration files to the current directory
cp ../config/examples/Creality/CR-10S/* ./If you want to make changes to the defaults, now is the time to edit the files you just copied in. The defaults will work fine. You can also copy another printer’s example configuration in if you’re not using a CR-10S.
Build it!
- This builds the firmware, it shouldn’t take long and it will open a window telling you if it passed or failed. You will be asked about your board CPU, you want 2560 for your CR-10S. If you’re using another board, you should verify before going further.
If you’re doing this over SSH, make sure to forward X (-X) or the build step will fail with an error about $DISPLAY. There’s probably a way to get it to not require X but I’m not sure how.
	# cd back into the main directory
	cd ..

	# run the build
	python ./buildroot/share/vscode/auto_build.py build
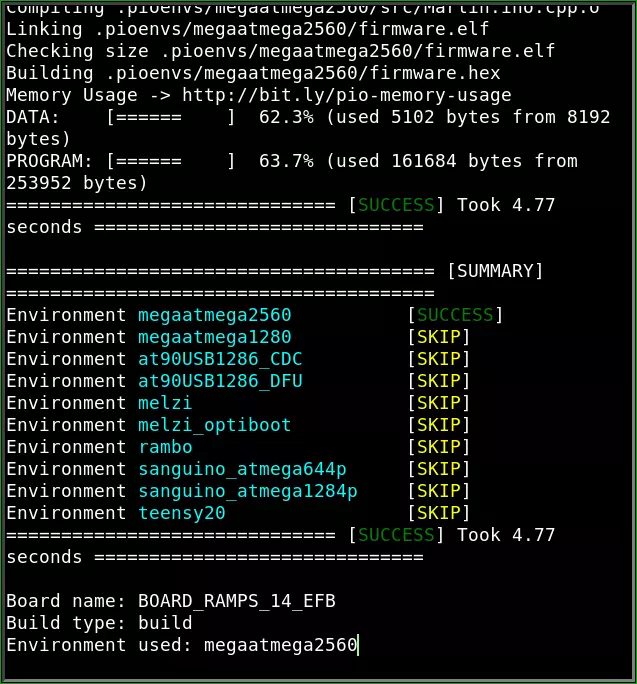
A successful build will look like this:
Obtaining the firmware
You’ll find the firmware file at Marlin/.pio/build/mega2560/firmware.hex. You can use this with Firmware Updater to flash the firmware to your printer.
If the computer you’re building Marlin on is connected to the printer by USB, you can upload the firmware by running: ./buildroot/share/vscode/auto_build.py upload.
Happy 3D printing!
Other models you can build for
Here’s a list of other included configurations:
└── examples
    ├── 3DFabXYZ
    │   └── Migbot
    ├── adafruit
    │   └── ST7565
    ├── AlephObjects
    │   └── TAZ4
    ├── AliExpress
    │   ├── CL-260
    │   └── UM2pExt
    ├── Anet
    │   ├── A2
    │   ├── A2plus
    │   ├── A6
    │   └── A8
    ├── AnimationExample
    ├── AnyCubic
    │   └── i3
    ├── ArmEd
    ├── Azteeg
    │   └── X5GT
    ├── BIBO
    │   └── TouchX
    │       ├── cyclops
    │       └── default
    ├── BQ
    │   ├── Hephestos
    │   ├── Hephestos_2
    │   └── WITBOX
    ├── Cartesio
    ├── Creality
    │   ├── CR-10
    │   ├── CR-10_5S
    │   ├── CR-10mini
    │   ├── CR-10S
    │   ├── CR-8
    │   ├── Ender-2
    │   ├── Ender-3
    │   └── Ender-4
    ├── delta
    │   ├── Anycubic
    │   │   └── Kossel
    │   │       └── images
    │   ├── FLSUN
    │   │   ├── auto_calibrate
    │   │   ├── kossel
    │   │   └── kossel_mini
    │   ├── Geeetech
    │   │   └── Rostock 301
    │   ├── generic
    │   ├── Hatchbox_Alpha
    │   ├── kossel_mini
    │   ├── kossel_pro
    │   ├── kossel_xl
    │   ├── MKS
    │   │   └── SBASE
    │   └── Tevo Little Monster
    ├── Einstart-S
    ├── Felix
    │   └── DUAL
    ├── FlashForge
    │   └── CreatorPro
    ├── FolgerTech
    │   └── i3-2020
    ├── Formbot
    │   ├── Raptor
    │   ├── T_Rex_2+
    │   └── T_Rex_3
    ├── gCreate
    │   └── gMax1.5+
    ├── Geeetech
    │   ├── A10M
    │   ├── A20M
    │   ├── GT2560
    │   ├── I3_Pro_X-GT2560
    │   ├── MeCreator2
    │   ├── Prusa i3 Pro B
    │   │   ├── bltouch
    │   │   └── noprobe
    │   ├── Prusa i3 Pro C
    │   └── Prusa i3 Pro W
    ├── Infitary
    │   └── i3-M508
    ├── JGAurora
    │   └── A5
    ├── MakerParts
    ├── makibox
    ├── Malyan
    │   ├── M150
    │   └── M200
    ├── Micromake
    │   └── C1
    │       ├── basic
    │       └── enhanced
    ├── Mks
    │   ├── Robin
    │   └── Sbase
    ├── Printrbot
    │   └── PrintrboardG2
    ├── RapideLite
    │   └── RL200
    ├── RepRapPro
    │   └── Huxley
    ├── RepRapWorld
    │   └── Megatronics
    ├── RigidBot
    ├── Sanguinololu
    ├── SCARA
    ├── STM32
    │   ├── Black_STM32F407VET6
    │   ├── STM32F10
    │   ├── stm32f103ret6
    │   └── STM32F4
    ├── TheBorg
    ├── TinyBoy2
    ├── Tronxy
    │   ├── X1
    │   ├── X3A
    │   ├── X5S
    │   ├── X5S-2E
    │   └── XY100
    ├── tvrrug
    │   └── Round2
    ├── UltiMachine
    │   ├── Archim1
    │   └── Archim2
    ├── Velleman
    │   ├── K8200
    │   └── K8400
    │       └── Dual-head
    ├── VORONDesign
    ├── Wanhao
    │   └── Duplicator 6
    ├── WASP
    │   └── PowerWASP
    └── wt150