DIY IOT Environmental Monitoring (temp, pressure, RH)
- Why?
- Requirements / Design
- Parts
- Wiring
- Firmware
- Uploading the Code
- Set it Up
- Getting the Data
- Resetting Wifi Config
- Summary
Why?
I love IoT, but it really grinds my gears how many IoT products require some sketchy app to know your wifi password to be controlled. I’d much prefer that the device just served a web page with controls on it, or accepted commands over HTTP/S. You know, something simple that I could actuate from any device, not just a phone.
Luckily, there are some great workarounds to get more open firmware running on commercial IoT devices, like tuya-convert. It will even let you flash firmware on something like a lightbulb without cracking it open.
As much as I love tuya-convert for my cheap eBay IoT bulbs and smart switches, I wanted to try my hand at building some of my own devices based on the ESP8266 chip.
Requirements / Design
I wanted to monitor the environment in my apartment. That is, temperature, humidity, and whatever else might be on the sensor. I wanted the sensors to connect to the wifi, and serve a simple web page witht he sensor info.
In this case, I went with BME280s, which monitor temperature, humidity, and pressure. I initially didn’t care for pressure, but the BME280 is seemigly pretty good at it (notice how they all align, other than the offset based on their different altitudes within the house). However, that consistency, and the fact that it’s been used to predict weather for hundreds of years, made it a great addition.
I ingest all the data with LogicMonitor and display it on a dashboard. Each colored line on a graph is a sensor somewhere in the house. I’ve hidden the graph legend for privacy: 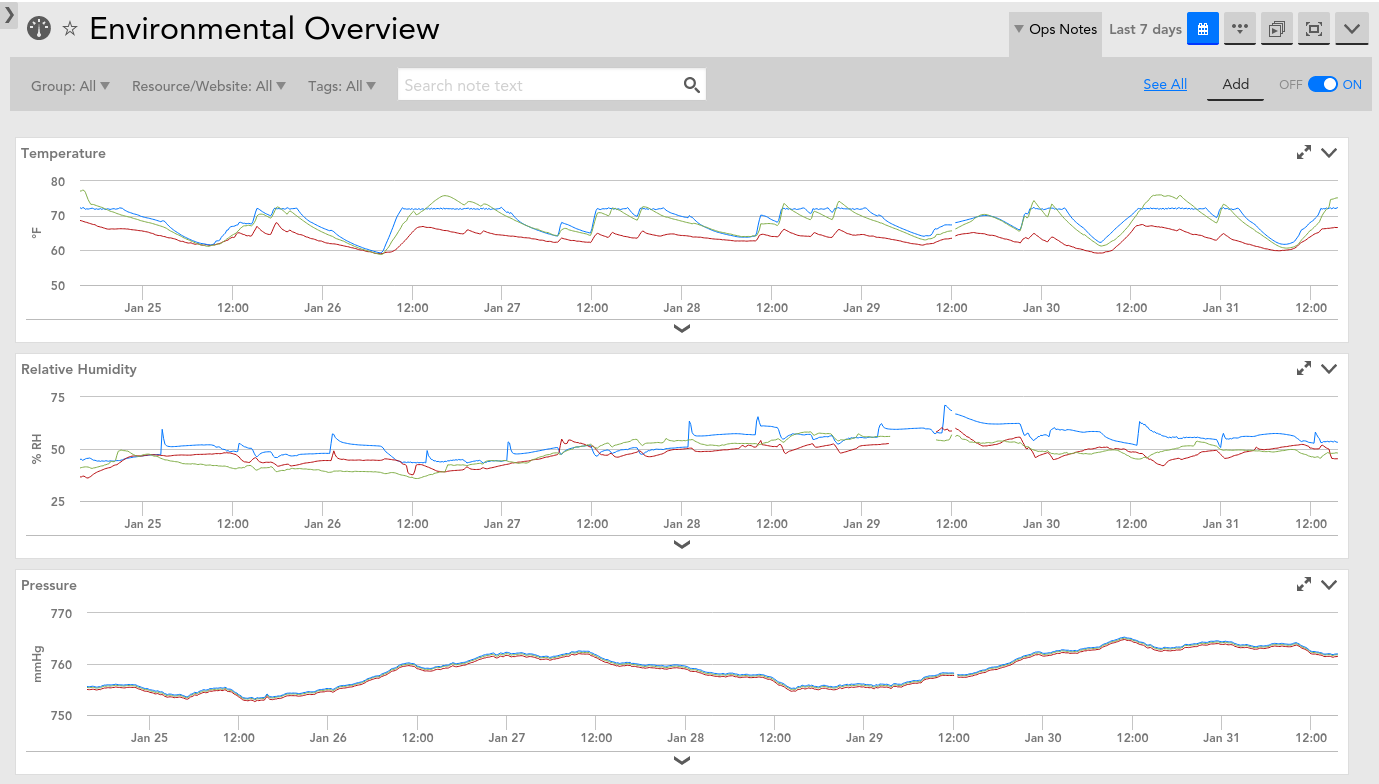
Let’s see how you can build your own!
Parts
- If you want to avoid the hassle of tracking down a real BME280, and are interested in buying a kit from me with everything you need (wires, sensor, board) for $14 (free shipping), please send me an email
Anyways, you can use a whole range of boards and sensors for this project, but this blog will use:
- Required
- 1x - Wemos D1 Mini
- 1x - BME280 sensor breakout, I2C
- avoid anything under ~$2.00, as it’s likely a BMP280, which lack humidity
- great post on BME280 vs BMP280
- Optional
- 4x - female-to-female jumper wires
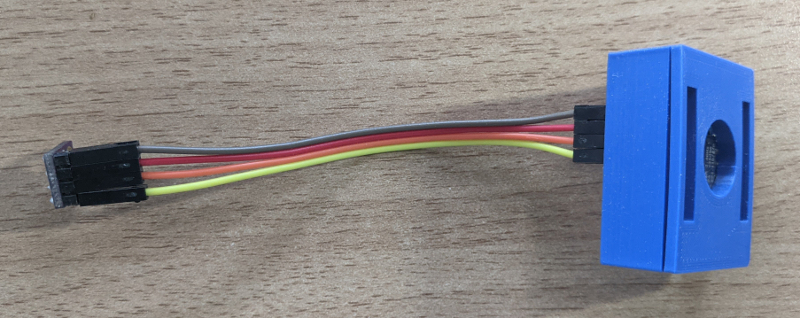
- 3D printed case from BrainFever on Thingiverse
Other decent options include:
- Boards
- ESP-12E
- Sensors
- BMP280 - lacks humidity
- DHT11 - lacks pressure
- DHT22 - lacks pressure, basically a better DHT11
- DS18B20 - great for just temp
If you want to use a different sensor, you will have to tweak the code. If you’ve done any intermediate coding, you shouldn’t have too much trouble with this. You can find dirt cheap sensors from China via eBay, Banggood, AliExpress. But again, if the price looks too good to be true, it’s probably a lesser sensor.
If you don’t want to do jumper wires, you can solder everything. I’m just lazy. I do occasionally knock a wire loose though, so consider that.
Wiring
Wiring this project is dead simple.
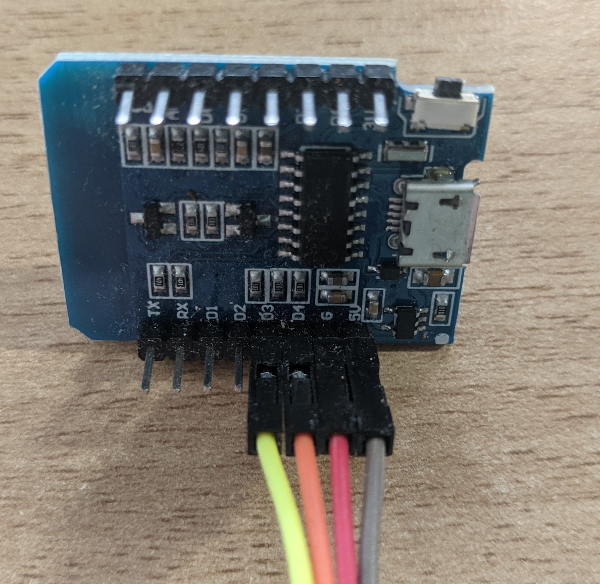
| Wemos | <- | -> | BME280 |
|---|---|---|---|
| 5v | VIN | ||
| GND | GND | ||
| SCL | D4 | ||
| SDA | D3 |
Wemos
BME280
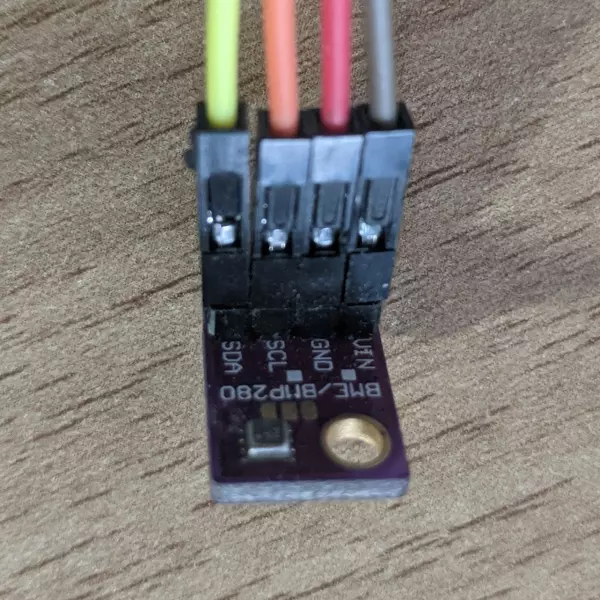
Use your jumper wires to connect the pins above, or solder them if you’re too cool for jumper wires.
Firmware
OK, first, we need to flash our ESP board with NodeMCU firmware. This lets us run the lua code that will handle connecting to the wifi, gathering sensor data, showing it on a webpage, etc.
You’ll want to build your own firmware with the required modules. Don’t worry, it’s dead simple with the NodeMCU cloud build service. You just pick the libraries you need, fill out a few other options, and wait a few minutes. You get an email link to your firmware, which you can flash with esptool.
For our purposes, you’ll need to ensure your NodeMCU image has the following modules:
- bme280
- enduser_setup
- file
- gpio
- i2c
- net
- node
- sjson
- timer
- uart
- wifi
Make sure to use the float version, not integer.
If you don’t want to build it on the site, you can just download the build I generated with NodeMCU Build.
./esptool.py --port /dev/ttyUSB0 write_flash -fm dio 0x00000 ./nodemcufirmware.bin
Uploading the Code
Once you have your firmware flashed, it’s time to upload our code. For this, you can use Esplorer to send the file. If the command line is more your speed, you can use nodemcu-uploader to push the file to the board.
# take ownership of the serial device so we don't have to give nodemcu-uploader root privs
sudo chown `whoami` /dev/ttyUSB*

# upload the file
python3 ./nodemcu-uploader.py upload init.lua
Make sure to save it to the board as init.lua if you want it to run at boot.
You’ll want to edit the alt variable at the top of the file to be the altitude ( in meters ) of your sensor. This is used in the sensor reading calculations.
You can also get the follow code at this gist.
-- init.lua
------------

-- Altitude for calculating pressure
alt = 50 -- change this to your altitude in meters

-- Sensor Pins
sda, scl = 3, 4 -- leave these unless you're using different pins
print("Set up i2c...")
i2c.setup(0, sda, scl, i2c.SLOW)

print("Set up temp sensor...")
bme280.setup()

-- load params file if exists
if file.exists('eus_params.lua') then
    print("Load saved EUS params...")
    params = dofile('eus_params.lua')
end

-- https://stackoverflow.com/a/57299034  # Brian Tompsett, 7/13/2019
function round(number, precision)
   local fmtStr = string.format('%%0.%sf',precision)
   number = string.format(fmtStr,number)
   return number
end


-- if the params file exists, and has wifi creds, connect using them
if params and params.wifi_ssid and params.wifi_password then
    -- connect with cred ssaved in eus_params.lua
        wifi.setmode(wifi.STATION)
    print("Setting up wifi client...")
    station_cfg={}
    station_cfg.ssid=params.wifi_ssid
    station_cfg.pwd=params.wifi_password
    station_cfg.save=false -- we'll load it from this file, not flash
    wifi.sta.config(station_cfg)
    function callback()
        print('wifi status ' .. wifi.sta.status())
    end

    wifi.sta.connect(callback)
else
    -- start the EUS to get credentails
    print("Initializing (EUS)...")
    enduser_setup.start(
    function()
        print("EUS: Connected to wifi!")
    end,
    function(err, str)
        print("EUS: Err #" .. err .. ": " .. str)
    end
    )
end

-- every 30 seconds, run update_sensors() function to get new values
update_timer = tmr.create():alarm( 30000, tmr.ALARM_AUTO, function() update_sensors() end )

-- data array that holds the current sensor values
data = {}

-- Webserver for retrieving sensor data. Runs on port 8080, returns the `data` object as JSON
srv = net.createServer(net.TCP, 30)
if srv then
    srv:listen(8080,
    function(conn)
        conn:on("receive",function(conn,payload)
            conn:send("HTTP/1.1 200 OK\n\n")
            if string.match(payload, "GET") then
                conn:send(sjson.encode(data))
            end
            if string.match(payload, "POST") then
                conn:send("Reseting...")
                file.remove("eus_params.lua")
            end
            conn:on("sent",function(conn) conn:close() end)
            conn = nil
        end)
    end)
end

-- reads from the BME280 and updates the `data` array
function update_sensors()
    local raw_data = {bme280.read(alt)}
    data["temp_c"] = round(raw_data[1]/100.0, 2)
    data["temp_f"] = round(((raw_data[1]/100.0) * 1.8) + 32, 2)
    data["pressure_mmhg"] = round(raw_data[2] * 0.000750061683, 2)
    data["humidity"] = round(raw_data[3]/1000.0, 2)
    state = wifi.sta.getip()
end


update_sensors()
Set it Up
Once you’ve uploaded init.lua reset the board. On a wifi-enabled device, find the setup network for the device. It should start with “NodeMCU”, it won’t require authentication. Once you connect, try to navigate to example.com in a browser. You’ll see a prompt for your SSID and password. Enter them and hit save. After a few seconds, you should see a success message. The device will then be connected to your wifi.
Getting the Data
So, if you looked at the code, you’ll see that we spun up TCP socket on port 8080. This is a really barebones web server that returns a JSON object with our sensor data. From your network, you can retrieve your sensor data easily with curl:
curl --silent 10.0.0.151:8080 | jq .
{
  "temp_f": 71.438,
  "humidity": 54.206,
  "pressure_mmhg": 761.39286484508,
  "temp_c": 21.91
}
Resetting Wifi Config
The easiest way is to serial in and delete eus_params.lua. This can also be done easily via ESPlorer.
Summary
Well, there ya have it. These sensors only cost a few bucks to build, and provide a lot of useful environmental data.
Beyond
There’s a lot you can do to extend this project, the possibilities are pretty endless. Here are a few ideas:
- Round the output values a bit more, particularly
pressure_mmhg - Add a button to reset the wifi config
- Add an ambient light sensor
- Add an air quality sensor
- Make it push data instead of serving it
- Run it off of solar power and a battery
- Setup alerts when environmental conditions are out of range:
- Drafty room
- Leaky basement w/ humidity issues